Blog

  • Inline CSS for better emails

    Inline CSS for better emails

    The technology behind your next fancy email is so outdated! Limited by HTML and CSS from 5+ years ago it can be a pain getting your email to work and look correctly in all email clients. Not only do you have HTML and CSS version limitations, but the email client also itself have various limitations, for example Yahoo can sometimes strip out any CSS you include in the head of the email via the <style> tags!

    Came across this cool tool from Campaign Monitor, which will take your HTML email and inline all your CSS, so certain email clients don’t strip your styling from the head! Give it a shot and let me know how you get on.

    https://www.campaignmonitor.com/resources/tools/css-inliner/

  • WooCommerce emails add reply to header

    WooCommerce emails add reply to header

    A client was having issues with bounce back due to customers entering incorrect email addresses, so I updated the outbound email address used by WooCommerce to “[email protected]”, this meant any bounce backs would go to a null mailbox instead of to their mains “[email protected]” mailbox. However, this meant when customers hit reply, it would reply to the noreply@ mailbox. Using this code, I was able to set a Reply-To header, so customers could still reply to emails.

    Code

    Drop this into your functions.php file and edit as required.

    This code is provided as it and may require changes to work for your needs.

  • WordPress include private pages in parent dropdown

    WordPress include private pages in parent dropdown

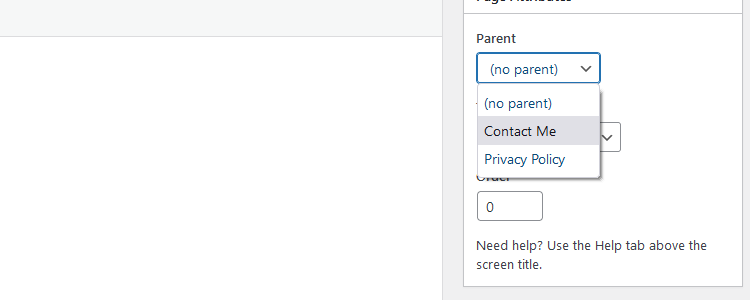
    WordPress only includes published pages in the parent page dropdown, I ran into an issue where both parent and child page were made private so work could be done to the pages, the child pages when edited lost their parent relationship, due to the parent page no longer appearing within the “Parent” dropdown.

    Why would you need this?

    In my case we wanted to make some changes to the existing pages but needed to do these changes in private until all where complete, it was not until after we re-published the pages, we found the child pages where no longer link to the parent.

    Fix

    Let’s add the private and pending pages to the parent dropdown menu, allowing us to pre-create pages and child / parent relationships without having to already have published the pages.

    This code is provided as it and may require changes to work for your needs.

  • SuiteCRM – clear / reindex search index

    SuiteCRM – clear / reindex search index

    Came across a problem with a SuiteCRM where the search was not working correctly, returning none or unrelated results. SuiteCRM relies on an indexing service called Lucene, which handles indexing for advanced searches, as in my case, this needs to be full reindexed to work correctly.

    1. Lock Files

    When Lucene begins indexing it generates lock files, normally found under modules/AOD_Index/Index/Index with the extension .lock, it is save to delete these files if they are old (have an old time stamp), sometimes this is enough to fix the issue, as previous indexing attempts max have failed and left the lock file, stopping future indexing processes from starting. First try, removing these lock files and wait and see if the indexing processes continue / repair them selfs.

    2. Full Reindexing

    I would recommend you do a full backup of the modules/AOD_Index directory before starting, as well as a backup of the database.

    Also temperarly stop cronjobs from running, as we dont want the cron indexer to kick in during this clearing process.

    1. Rename index folder (can be deleted after)

    From your SuiteCRM root directory:

    mv modules/AOD_Index/Index/Index modules/AOD_Index/Index/Index.BACKUP

    We are renaming your current (old) index to Index.BACKUP, you can delete this later once you are sure everything is resolved.

    2. Empty Table

    Now delete all rows from the table aod_index

    3. Schedules

    Make sure the Optimise AOD Index and Perform Lucence Index are running as part of the schedule.

    4. Wait

    Make sure you have re-enabled your cronjob and wait for the indexes to rebuild. This will take a long time, but you can monitor the rebuilding process with the below command. Once it has stabilised, it should be complete.

    watch du -h modules/AOD_Index/Index/Index


    This code is provided as it and may require changes to work for your needs.

  • NCDU – Find what’s using all your disk space on linux based system

    NCDU – Find what’s using all your disk space on linux based system

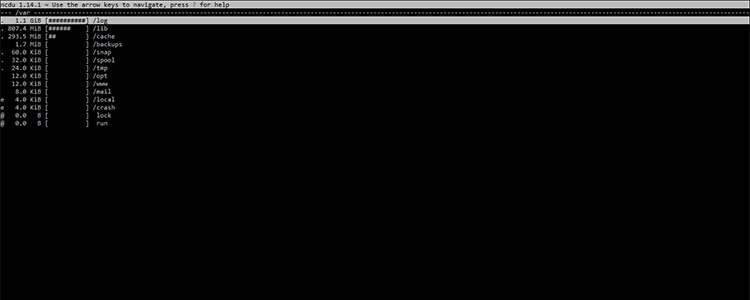
    NCDU is a text-based user interface, it allows you to visually see how and where disk space is being used via an easy-to-use interface. Simple run the command in the current directory to see a directory tree of folders & files and their space usage.

    I use this tool mainly for analysing why a server is running out of disk space, determine the reason why and if it’s simply expanded the disk space or is there unused files / massive logs which can be purged.

    Install

    Run the required command for your linux OS version.

    sudo apt install ncdu

    sudo yum install ndcu

    How to use

    Simple navigate to a directory you want to check and run the command:

    ncdu

    If you want to scan the whole system go to the root directory:

    cd /
    ncdu

    You can also specify a directory if you don’t want to change directory:

    ncdu /home

    Windows Server / PC

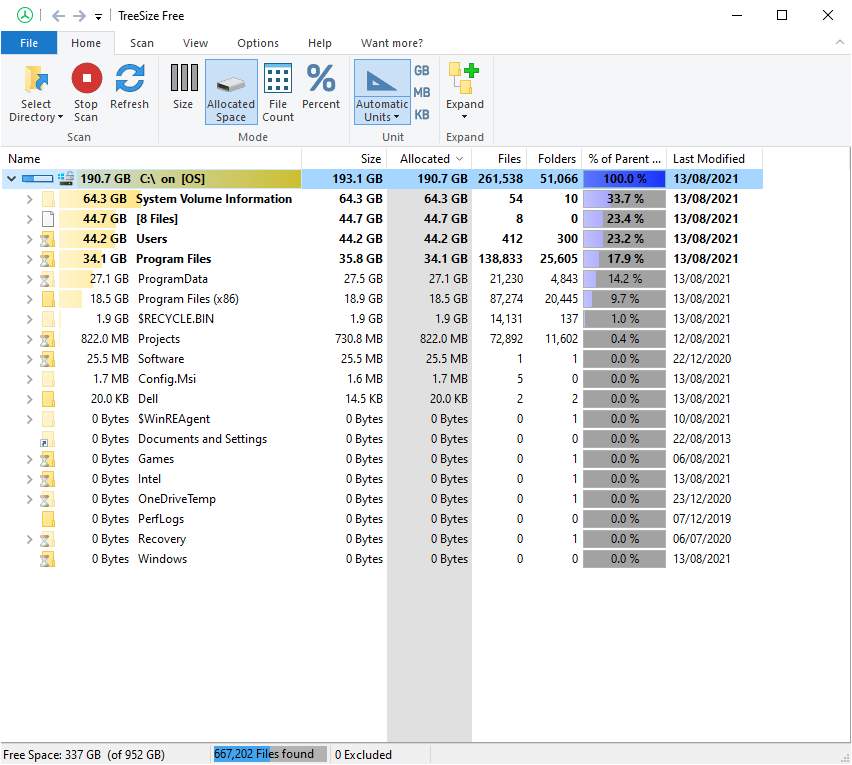
    For windows-based machines I use a bit of software called TreeSize, it does the same thing as NCDU, allowing you to see how your disk space is being used on a windows based OS.

    TreeSize on windows PC showing disk space usage
    TreeSize on windows PC showing disk space usage


    This is provided as it and may require changes to work for your needs.


  • WordPress disable XMLRPC.php for increased security

    I have recently been having a few issues with bots and malicious attacks trying to breach WordPress websites via brute force attacks. From my experience 90% of the websites, I have built or worked on never utilise the xmlrpc service, which is included with WordPress, due to this I decided to simply block any access to this service via Apache, which fixes a number of security related issues.

    Code

    Place this in your websites .htaccess file to take effect, then simply browser to domain.com/xmlrpc.php and you now get an access denied message.

    What is XMLRPC?

    The xmlrpc.php allows remote access to your WordPress site, it allows various tools and publishing applications to control and manage content from outside of the normal WordPress admin. For example, a publishing tool may allow you to write new blog posts using an alternative tool (instead of the WordPress admin).

    Do I need it?

    If you do not use any tools / services which utilise xmlrpc, then you do not need it and can apply the block in this post. For example, if you use the WordPress app to manage your website from your phone then you will need to keep XMLRPC working.

    Why block XMLRPC?

    Due to the nature of XMLRPC, it allows remote services to connect and perform actions on your website, this creates an additional security risk, and it is very common for malicious attacks to target XMLRPC with bruite-force attacks, trying to guess your password and / or access other services exposed by the XMLRPC protocol.

    This code is provided as it and may require changes to work for your needs.
  • How I deleted 530 million records from a large MySQL database table hitting nearly 200GB

    Came across the need to perform maintenance on a MySQL database which holds millions of records, we needed to remove all data which was 2+ years old which involved deleting around 530 million records from a very large table, hitting nearly 200GB.

    Problem

    Due to the size of the database and transaction logs / table locking, it wasn’t possible to do a bulk delete such as

    This caused the database to become very unresponsive and after hours of running eventually failed with table locking issues. This is because DELETE operations are very costly due to all the checking and transactional logging involved.

    I tried creating a second duplicate table and inserting the data we wanted to keep into this table, however this involved turning the system offline during this process, after some testing locally, was going to take roughly 90 hours to complete, this was not an option.

    Solution

    I created a MySQL stored procedure, which allowed me to split the DELETE query into chunks, stored procedures are not handled as a single transaction, this allowed each delete operation to complete and move onto the next chunk, slowly deleting the data from the active table whilst the table is still in use.

    As it was costly to query against the table or use LIMIT & OFFSET, which would take around 10 minutes to return results, it was not possible to use these as part of the procedure if we wanted this process to complete in a timely manner.

    As the ID where incremental, I was able to query the table until I found the largest ID I was willing to delete up to, in my case it was 530,000,000.

    The below stored procedure is what I ended up using to solve the issue.

    It is recommended a professional under takes these actions, please always backup existing data / files / configs.

  • cPanel – Sender x has an outgoing mail hold. Message will be reattempted later.

    A client was having issues sending emails and receiving a number of alerts regarding delayed emails. After looking investigating a number of outbound emails where queued with a failure reason of:

    The account in question had hit the sending limits configured within cPanel and there emails where being held.

    Pre-Checks

    It is important you pre-check and make sure the hold is not legitimate such as a spam attempt / hacked site, I checked the emails being sent and due to a influx in online orders there email usage per day has significantly increased.

    1st Attempt

    Try running the following commands under sudo / root, replaceing [accountname] with the cpanel account name of the user. Then try send an email or retry sending an email in the queue.

    2nd Attempt

    The above worked for a couple accounts, but for one this did not work. There is 3 files depending on the type of block. Have a look in the following files below and remove the accountname / email address if present.

    I found my user within “/etc/outgoing_mail_suspended_users” and once removed, everything went back to normal.

    It is recommended a professional under takes these actions, please always backup existing files / configs.

  • WooCommerce admin filter products by image

    A client recently asked me to add a filter to the WooCommerce admin products list so they can filter items based on if the item had an image or not. This allowed them to easily find products which had missing images so they could correct.

    Why not take a look how to filter by on sale items?

    Code

    This code is provided as it and may require changes to work for your needs.

  • WooCommerce delayed webhooks using actions scheduler

    Recently been contacted by a user who needed the ability to delay the WooCommerce webhooks by x time, this would allow other processes happening on the site to finish instead of firing the webhook straight away, for example waiting for the payment process to finalise. Delaying webhooks is not common practice, however some time special case arises!

    Take a look at actions scheduler if you wish to read more into the scheduler system used by WooCommerce.

    Code

    The following code allows you to delay several WooCommerces webhooks by a set duration (seconds) and also run in two modes.

    1. Single Webhook, creates 1 single webhook but delayed by x seconds.
    2. Multi Webhook, creates 2 webhooks, the normal webhook created by WooCommerce and a second repeat webhook which runs x seconds later.

    This code is provided as it and may require changes to work for your needs.