Recently I have been setting up various Windows server operating systems but have always had the same issue which is how to communicate / manage that server remotely, windows servers by default are managed via the RDC (remote desktop connection) but I want the ability to log into cmd (command prompt), transfer data and port forwarding. FTP isn’t an option due to data being transferred in plain text meaning anyone with the correct knowledge can view everything I’m transferring, this is why I need a secure FTP connection which just happens to be called SFTP, but to do this the remote server I’m connecting to needs a SSH server which windows doesn’t come with or natively support (unlike Linux operating systems which are fully controlled via SSH making life much easier). Below are 4 posts I have already written about SSH and how to use SSH.
SSH Password v Public/Private Key Authentication
Creating an SSH connection using password authentication
Creating an SSH connection using public/private authentication
Thanks to software developers SSH technology can now be installed on a Windows operating system giving you the full benefits of a SSH server including the ability to access cmd remotely, use SFTP for a secure data transfer and also give you the ability to port forward which we will not be getting into in this post.
There are various software choices available but I have chosen to use freeSSHd as I found it very easy to setup which took about 5 minutes. The installation process is like any other application and all you need to do if follow the installation steps, at the end of installation you will be prompted to create private keys I would recommend click Yes, and then you will be prompted if you want to install freeSSHd as a windows service, this option is entirely up to you but as I want my SSH server to always run and be hidden whilst running I installed it as a windows service.
Server Starting, Stopping and Restarting
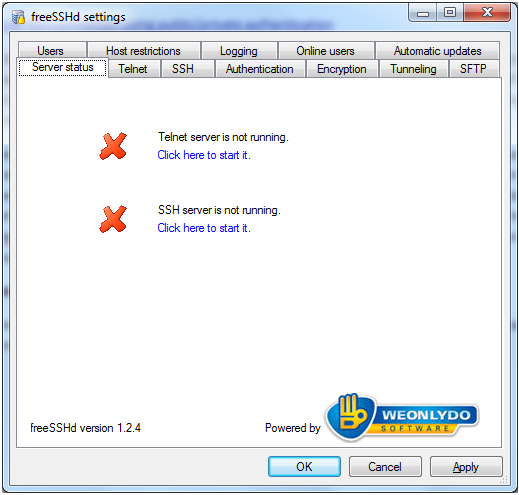
The server is managed via a graphical interface it can be managed via command line as this was the normal method until one of the latest updates added the graphic interface. When you first run the application you will see a screen like this.
If you are running the server as a service it will say the SSH server is not running and this is normal, if you’re not running it as a service and receiving this screen then your SSH server isn’t running. The main difference between running it as a service and a normal program is that the graphic interface has to be running for the server to run if not installed as a service, starting, stopping of the server is also done through the graphical interface.
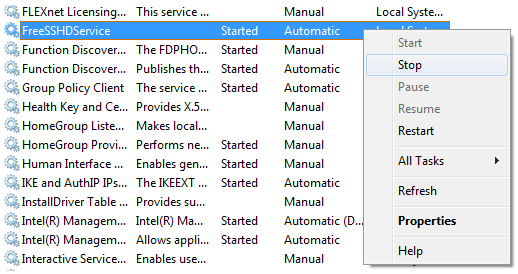
If you’re running as a service then you use the graphical interface to adjust settings but you start, stop and restart the actual SSH server service by going into the Windows Services directory (to apply any new settings changes you must restart the SSH server) which if found by going to.
|
1 |
Control Panel –> Administrative Tools –> Services |
Find the service in the list it should be called FreeSSHDService and then right click it to see a list of options, remember that when you make a modification to the SSH server settings using the graphical interface you must stop and start the SSH server for the changes to take effect.
Basic Configuration
Now we need to do some basic configuration such as setting up account login and home directory, once these have been set the default options for the rest of the settings are suitable for a basic setup, there is some which I would recommend changing but I will talk about them after we setup the login and home directory.
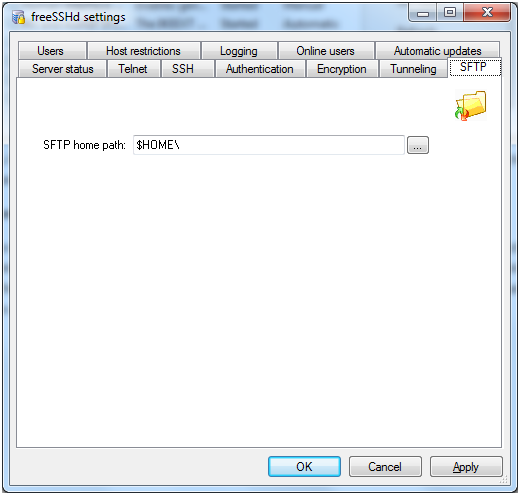
First we need to go to the SFTP tab; this is where we set the home directory which is the directory you will see when you login through SFTP. Due to only being able to set one directory for all SFTP logins I came across a problem when I wanted to share multiple folders and drives, please read further down where I will explain how I managed to share multiple folders and drives.
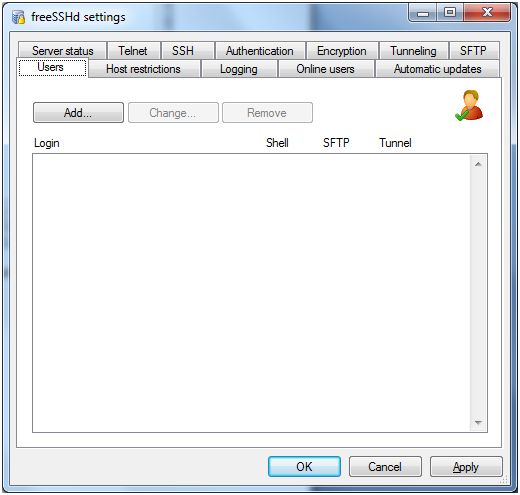
Now that the SFTP directory has been set all we need to do is create the actual user or users we want to login with, this is done by going to the Users tab.
A list of all the current users will be shown by default but as I have just installed the software there is currently no users, this is also where you can modify and remove users as well as add which I am going to do now.
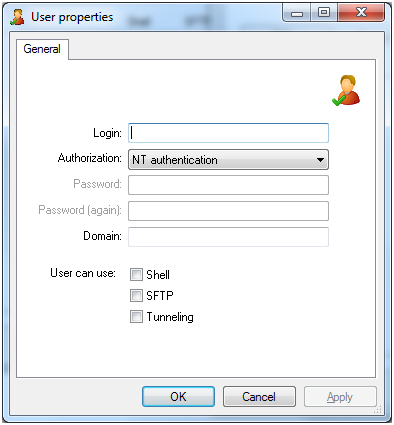
The user creation process is simple you simply click the Add button and the following window above will show, you then simply enter the desired username into the Login text field and select the authorization method from the drop down box, there are 3 options.
NT authentication
Uses the current Windows account already created on the system for authentication, you simply just have to specify the user’s username in the Login text field and it will use the Windows password during login.
Password stored as SHA1 hash
If you don’t want to use the Windows account for login then you can provide a username and password by choosing this option, this is the option I have chosen as I don’t want to create separate Windows logins for each user who needs SSH access.
Public Key (SSH only)
Public keys is another login method which is probably the most secure, here is a blog post I have already written about public and private key authentication. SSH Password v Public/Private Key Authentication.
Now that we have selected a username, password and authentication method all we need to do is specify what access rights the user has, Shell is the ability to login using a SSH client like PuTTy to gain access to command prompt. SFTP is the same as FTP but secure/encrypted and tunnelling is the ability to forward port traffic from the computer the SSH client is on to the SSH server (this is also known as port forwarding and should only be allowed for trusted users).
Advanced Features
These features are fine by default but I would recommend adjusting most of them to help increase security and so that it runs exactly how you want it to. Remember this SSH server allows people to gain access to your files via SFTP and SSH allows access to command prompt where alot of damage can be done.
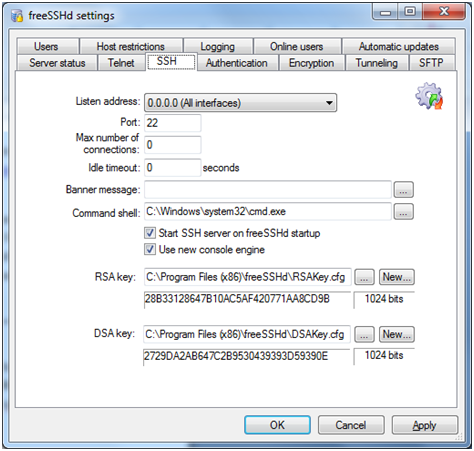
This is where all the main SSH settings are configured in relation to the actual SSH server, the listening address and port number is the actual IP address and port the server will listen for communication data. We can also limit the max connections and idle timeout so that people can’t stay logged in forever. You can set a custom message in the banner message text field which will display to the user once they login, the command shell is the actual application which the user will see when logging into SSH. The RSA and DSA key are used during public and private key authentication, if these keys where to get lost or compromised this is where you can generate new ones so that the old ones no longer work.
Host restrictions
These options allow you to provide a list of IP addresses and IP address ranges, you can either allow or refuse this list of addresses. If you are always going to be connecting from a single or group of IP addresses its best to limit the SSH server to only allow connections from the IP addresses which you will be using, this will limit the chance of unauthorised login.
Logging
Keeping a log is very important as your able to back track who has logged in what they did, this is very important as you can get the IP addresses of any potential attacks and block them either via the host restrictions or firewall.
Online Users
This simple just allows you to see who is currently logged on, if you have installed the server as a services this will now show you if any users are logged in.
Automatic Updates
I would always recommend keeping up-to-date especially with security issues always arising, if you are planning on having this SSH server running all the time I wouldn’t use the auto update feature as if something goes wrong you may not be able to gain access to your server again.
Authentication
SSH servers support two types of authentication password and public key authentication, this section allows you to specify what types of authentication your SSH server will accept. I have written various articles related to SSH which can be found here.
SSH Password v Public/Private Key Authentication
Creating an SSH connection using password authentication
Creating an SSH connection using public/private authentication
Encryption
All traffic is encrypted including whilst logging in, multiple encryption methods are supported but unless you have a reason for using a specific type this option should just be set to auto.
Tunnelling
SSH servers also have the ability to use port forwarding which allows a user to transfer data going to a specific port on their side to the SSH server, the options here allow you to specify if local port forwarding and remote port forwarding is allowed. Local forwarding is when you transfer data on a port from your local machine to the SSH server, remote forwarding is the complete opposite where you direct a port on the SSH server your local machine.
Leave a Reply